|
|
|
HTML Tutorial
So you want to create your own
website do you?
Well with a bit of luck I’m going to teach you!
When I eventually hit on the idea of creating a web site it was me that was in your position. If you’ve been to a bookshop you may have realized what an expensive habit web design can become. Mega tip for you never buy any book about web design you see any shop. You can find every thing you need to know and probably about 10 times better and more detailed on the web. Another thing with information on the web is it is straight to the point.
However I feel it is not straight to the point enough and those that are leave a lot out. So I decided that once I had learnt HTML I would help others in my position by writing my own guide and here it is!
First things first! What do you need to create a web site?
Well all you need somewhere to put your site and
someway of putting it there. On the
web you will find thousands of web servers that will provide you with somewhere
to put your site. You must first
consider how serious you are about a web presence.
If you are very series then I suggest you buy your own domain name, and
if you are serious make sure you buy a .com address. For example your address
could be, www.guitarzone.com this
obviously be a great domain name if you wished to sell guitars.
The more you pay to hold your domain name controls how much space you
have on the internet, but please only buy what you actually need 20mb can go a
long way. If however you just want
some fun on the Internet then you can rent some space of an Internet server
(this means that you get a small amount of web space for free), I rent my site
from www.20fr.com.
The only problem with renting a site is that you have to put up
advertising, which you may have noticed on my site.
So all you need to do now is find somewhere to put your site.
I suggest you check out www.20fr.com
but if you don’t fancy them then you could always check out angelfire or
tripod (or the hundreds of others on the net.)
So now you have found somewhere to put your site you need
to have someway of putting it there. There
are two ways about this. Most
server sites will now let you create your site online. This is generally easy to do although very limited.
You are limited to only a few options and are restricted on design
features. By far the best option is
to learn HTML. No don’t go!
I know this sounds really scary and off putting but its not half as bad
as you think. HTML is really is
easy to pick up and even if you’re a complete novice you should have picked up
the basics within a week. Besides
DragonHive is here to guide you through.
So what is HTML?
HTML or hypertext mark-up language is the code that makes
up a website. It is HTML that is
the essential basis of all web sites. Your
browser either Internet Explorer or Netscape is able to change the HTML into the
web sites you see every time you’re on the net. For a better idea about what HTML is go to the view menu in
you browser and select view source. That
is HTML! Now you’re really scared
I know but don’t panic I’ll break you in gently.
Oh one other thing before you get started you may want to bear in mind
that HTML in fact all computer languages use American English.
So remember the spelling differences if your British or Australian.
Meet the tag!
You will have noticed that the HTML code you saw when you
looked at it was full of text surrounded by these symbols < > for example
<html> don’t worry these are what we call tags. Hopefully this small example will clear things up:
<bold>This text is bold</bold>
In the example above the tags (the bits in the < and >) make the text between them bold.
Most, in fact almost all tags come in pairs and apply to the text they enclose.
Your first web page!
Already? Is it
too soon? Yes already, no of course it’s not to soon.
Trust me!
All you need is a simple text editor like notepad.
Open a new text file and call it myfirstwebpage.html (actually you can
call it what you want as long as it ends in .html!
Now all you do is type the following:
<html>
<head>
<title>My first web page></title>
</head>
<body>
Hey look everybody I have made a web page!
</body>
</html>
That’s it you’ve finished. Save your file open your browser. In your browser select file and open click browse and open your new web page. You should now see your website, you should see the text “Hey look everybody I have made a web page!” in your browser window. If you do well done you are well on the way to creating a real web site. If not don’t give up just try again, if your still having problems email me.
Lets break down what you did to make your web site:
<html> (this tells the browser that the document is a HTML file)
<head> (this is the head of the web page you cannot see this but this holds valuable information about your site)
<title>My first web page></title> (One of those valuable pieces of information you can include in your head, in this case your web page’s title)
</head> (ends the head section of your website)
<body> (starts the body section of your website this is what you can actually see when you view the web page)
Hey look everybody I have made a web page!
</body> (ends the body part of your web page)
</html> (ends the document)
Hopefully it all makes sense now. So you now have the knowledge of how to create a very simple web page. Everything else you do to enhance your web site is mere manipulation of the basic code you made above. As I showed you earlier to make the text bold you simply use the <bold></bold> tags. As this is such a common code you could actually just use the letter “B” instead of bold.
E.g. <b> This text is bold </b>
Other very simple tags include:
<u> </u> this underlines the text
<i> </i> this makes the text italic
See how easy HTML is, and to think at first you were worried.
Each of the following sections will deal with new HTML tags and effects. Things get a little more complicated from here. The principals are exactly the same it is just the tags that become harder, as they deal with more complex things.
Remember every time you want to view your page, to check on its progress, just save the notepad file and then open it in your browser as you did before.
Site editing programs:
Once you are familiar with the basics of HTML you can start to use a site-editing program. Examples of site editing programs are Microsoft’s Front Page and Macromedia Dreamweaver. Site editing programmers can be very expensive especially decent ones such as Dreamweaver, so if you’re not too serious about web design and don’t want to spend a lot of money, I’d stick to using notepad. If you decide to use a site-editing program, then it can make life a lot easier. Site editing programs are able to create HTML for you. You create a document by changing text sizes and fonts as well as adding images and tables and then the site-editing program transfers the document into HTML for you. Why? You ask did I not mention this at the start, simple my friend although web-editing programs are very useful in creating web sites to be able to use and understand effectively a site-editing program you need to understand the basics of HTML. Remember web-editing programs are not 100% efficient and do often make mistakes that’s why you should read on, even if you decide to use one, then you can edit the HTML code should you need too.
If you are using a site-editing program you do need a FTP (File Transfer Protocol) this is just a device that allows you to upload files on to the net. Most good servers allow you to do this. So you can create your web site in a site editor you then need to upload all the files your web site needs on to your web sites server.
Back on with the HTML!
Text
By far the most important thing o n your web site is the text, so you need to know how to manipulate it. On the web text size is not numbered in the normal way. The sizes go from –7 to 7 to alter text size you would put:
<font size=“x”>(text goes in here</font>
Where “x” is a number between –7 and 7. You can also edit text size using the heading tags <H1> is the largest and <H6> the smallest.
So you could put: <H3>(text in here)</H3>
To edit text font then you need to put this:
<font face="(name of font goes in here)"> (text goes in here) </font>
There are only a limited number of fonts you can use as browsers will only recognise just a select few. These are:
Arial, Helvetica, sans-serif
Times New Roman, Times, serif
Courier New, Courier, mono
Georgia, Times New Roman, Times, serif
Verdana, Arial, Helvetica, sans-serif
To use these just cut and paste the one you want into the font face tag.
You will soon realize that HTML ignores multiple spaces, tabs and carriage returns. You can get around this by using the preformatted text tags, these are <pre></pre>. Just place your text between the preformatted text tabs and you should be fine. If you just want an extra space you can achieve this by just typing “ ” instead of a space. If you want to achieve a line break that’s easy you just use <br>
To center text just use this: <center>(text here)</center>
To indent from both margins we use blockquotes:
<blockquote>(text in here)</blockquote>
Three really simple ways to emphasize your text are to use bold, italics and underline.
<b> This text is bold </b>
<u> This text is underlined </u>
<i> This text is in italics </i>
You can find
out how to color your text in the next section.
Backgrounds and colors:
One thing you will notice with the web pages is that the background can be any color you want. This can be achieved with a very simple HTML code.
<body bgcolor=“#000000”>
This will change the background color you want, the bit in the quotation marks is the color’s code. All colors used on the Internet are generated using a hex code. This is a code made up of 6 characters. The first two colors dictate the amount of red, the second two green, and the third blue. The browser then works out the color you want from the code.
The hex code for white is #FFFFFF so you would put:
<body bgcolor=“#FFFFFF”
Browsers are also able to recognise simple color words, for instance if you were to put “red” “purple” or “yellow” instead of the code then it would still work.
You can also choose the color of text in the same way. You would put:
<font color="#FF0000">(text here)</font> for the color red
Images:
I knew it wouldn’t be long before you wanted to add images to your website this is real easy when you know how. On a web site you want your images to take up as little memory as possible. On the web we tend to use gif images. With the end .gif the advantages of gifs are they can be short moving images or a still image, they are also very small in memory.
All you need to do to input an image into your website is to use the <img> tag. Like this:
<img src=“(image location here)”>
Example, if you wanted to add a picture called fred that was stored in your images folder on your website, to your page you would put:
<img src=“/images/fred.gif)”>
This will displays the image full-sized and bottom aligned with adjacent text.
Ah, you have noticed the problem. With the above code you have no way of resizing your image. This easily rectifiable just look at the code below (using the same example as above).
<img height=100 width=150 align=left vspace=10 hspace=20 border=50 src=“/images/fred.gif)”>
Now don’t worry if you think that looks a bit complex I’ll break it down for you, what it actually means is that you want an image called fred to be placed on the page at 100 pixels tall and 150 pixels across, that is aligned to the left of the page, that is separated from the text by 10 pixels vertically and 20 pixels horizontally. Easy! Lets look at it bit by bit:
height=100 // This bit tells the picture how high to be. This is measured in pixels. At first you won’t really know what one pixel is. Just use trial and error until you get the size you want, you’ll eventually pick it up. You can change the hundred to what every height you want.
width=150 // The same as above but for the width of the picture.
align=left // Aligns an image to the left of the page. See separate section for other alignments.
vspace=10 // This specifies the vertical distance
between the picture and the text. In
this case 10 pixels. The 10 can be
changed to whatever you want.
hspace=20 // Same as above but for horizontal space.
border=50 // Gives the picture a border of 50 pixels. You can change the 50 to whatever you need.
You can place all these extras for controlling your picture between the “<img” and “src” of any image. Reducing the size of the image can also reduce the amount of memory it takes up you may want to bare that in mind.
Alignments:
I’m going to go through this very quickly. Believe me it’s just so easy. You can align pictures with these codes.
<div align=(alignment here)>(text here)</div>
align=left // Aligns the image to the right of the page
align=right // Aligns the image to the left of the page
align=centre // Aligns the image to the centre of the page
align=middle // Aligns baseline of text with middle of image
align=text top // Aligns the top of the image with tallest text in the line
align=baseline // Aligns bottom of the image with the baseline of text on that line
align=bottom // Aligns the bottom of the image with the bottom of the text on that line
align=absmiddle // Aligns the middle of the image with the middle of text
To align text you use this code:
<div align=(alignment here)>(text here)</div>
Be careful when aligning text not all the codes work. I would stick to using left, centre and right.
Text behind images:
Sometimes images can take immense amounts of time to load and sometimes not load. So if you want to be nice you can place text behind images. Actually it’s really simple all you do. Just put:
alt=“whatever you want in here, a description of the image would be a good idea”
And then place that anywhere between the “<img” and “src” of the tag for the image.
Lists:
With HTML you can have three different types of lists: ordered, unnumbered, and definition. Wow, they sound posh. Well they’re not.
Ordered lists:
Ordered lists are controlled with the tag <ol>(list goes here)</ol> then each item in the list has to have <li> in front of it. It would probably be easier to show you an example:
<ol>Shopping List:
<li> Coffee
<li> Milk
<li> Eggs
</ol>
Gives you:
Shopping List:
1. Coffee
2. Milk
3. Eggs
Unnumbered lists
Unnumbered lists work exactly the same as ordered lists but instead of using <ol><ol/> to define the list we use <ul></ul>. The only other difference is there isn’t any numbers instead there’s bullets. So this time the <li> produces bullets not numbers. Here’s the example:
<ul>Shopping List:
<li> Coffee
<li> Milk
<li> Eggs
</ul>
Gives you:
Shopping List:
• Coffee
• Milk
• Eggs
Definition lists:
Definition lists just indent lines to make a list. This time the <dt> and <dd> separate the lines. See the example:
<dl>
<dt>Playstation
<dd>Nintendo
<dt>X-box
<dd>PC
</dl>
Produces:
Playstation
Nintendo
X-box
PC
Tables:
Now these are tricky. Tables are one of the hardest things you have to do in html. But once you’ve mastered them they have no end of uses. They are brilliant for page formatting, as tables can allow you to place what you want where you want. Brilliant! Tables are defined by the tag <table></table> easy so far. You can then add rows to your table buy using the tags, <tr></tr> and for a different column you use <td></td>. Easy when you know how!
Lets start of with a simple example, the code:
<table>
<tr>
<td>A</td>
<td>1</td>
</tr>
<tr>
<td>B</td>
<td>2</td>
</tr>
<tr>
<td>C</td>
<td>3</td>
</tr>
</table>
Makes the table
|
A |
1 |
|
B |
2 |
|
C |
3 |
Easy see! The thing with tables that makes them complicated is they are so long so it is easy to get lost, the other thing is you also need to control your table. While the above code is good for just creating a table you need to know how to change things like column and row length.
Lets go with the example, and then break it down.
<table width="349" border="2" cellspacing="5" cellpadding="10" height="300">
<tr align=right valign=bottom>
<th colspan="2" rowspan="2">A</th>
<th width="107">1</th>
<th width="22" rowspan="2">!</th>
</tr>
<tr align=right valign=bottom>
<th width="107">A1</th>
</tr>
<tr align=right valign=bottom>
<th colspan="2">B</th>
<td width="107" bgcolor="#FFFF33" bordercolor="#33CC33">2</td>
<th width="22">?</th>
</tr>
<tr align=right valign=bottom>
<th width="54">C</th>
<th width="45">D</th>
<th width="107">3</th>
<th width="22">$</th>
</tr>
</table>
Produces this beast:
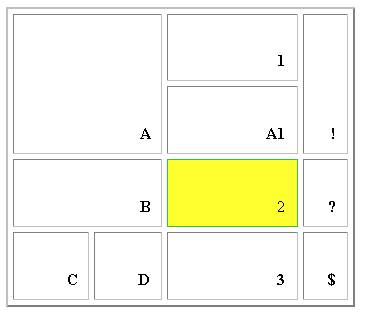
Yes I know that looks really complicated. Hold on while I try and help explain it!
<table // starts the table
width="349" // specifies the width of the table in pixels
border="2" // specifies the border around the table in pixels
cellspacing="5" // sets the amount of space between the cells
cellpadding="10" // sets the amount of space between the cells border and it’s content
height="300"> // sets the tables height
<tr align=right valign=bottom> // starts a new row aligns the text to the right of the cell and sets the vertical alignment of the text to the bottom.
<th colspan="2" rowspan="2">A</th> // starts the first column tells the cell how many columns to span and how many rows to span.
<th width="107">1</th> // starts second column specifies the column width (107 pixels)
<th width="22" rowspan="2">!</th> // starts the third column and tells it to have a width of 22 pixels and span 2 rows
</tr> // ends row
<tr align=right valign=bottom> // starts extra row for row 1
<th width="107">A1</th> // specifies width of row
</tr> // ends row
<tr align=right valign=bottom> // starts second row
<th colspan="2">B</th> // column 1 - tells the cell to span to columns
<td width="107" // width of column 2
bgcolor="#FFFF33" // sets the background color of the cell
bordercolor="#33CC33">2</td> // sets the border color of the cell
<th width="22">?</th> // column 3 – width of 22 pixels
</tr> // end of row
<tr align=right valign=bottom> // starts third row – aligns text right and bottom
<th width="54">C</th> // starts column 1a
<th width="45">D</th> // starts column 1b
<th width="107">3</th> // starts column 2
<th width="22">$</th> // starts column 3
</tr> // ends row
</table> // ends table
I hope you understood most of the above. I did say tables were difficult. I will now just list the major table attribute codes, just to help you:
Basic table tags
<table></table> // creates the table
<tr></tr> // creates the tables rows
<td></td> or <th></th> creates the columns within a row
Table attribute tags:
table width=“(insert number of percentage of page)” // table width
table height="(insert table)" // sets the tables height
table border=“(insert number)” // creates table border in pixels
table cellspacing=“(insert number)” // sets amount of space between cells
table cellpadding=“(inset number)” // sets amount of
space between cells border and cells content
The above tags can all be placed within the table tag, that is:
<table (all extra tabs go in here)>
Table alignment tags:
td align=“(insert alignment in here)” // you can align text within the cells with this tag, either left, centre or right.
td valign=“(insert alignment in here)” // you can align text within the cell vertically with this tag, either bottom, middle or top.
These tags can be placed within the row tag <tr>. For example:
<tr (alignment in here)>
You can change the width of the column by inserting the width tag within the column tag (<th>). For example:
<th width="(cell width in here">(cell content)</th>
I hope that’s made it a bit simpler.
Links:
Links these are one of the most important aspects of a web site. These are what provide your site with links to other sites. Links can be attached to text icons or buttons.
Link to another website insert this tag into your text:
<a href=“http://www.dragonhive.20fr.com”>Dragon Hive</a>
The above means that by clicking on the words “Dragon Hive” it would load the page http://www.dragonhive.20fr.com
Link to a page on your site:
<a href=“open.html”>ENTER</a>
The above means that when you click on “ENTER” it opens the page open.html. You will notice that you do not have to include all the “http://www.dragonhive.20fr.com” this is because the page is within the same directory.
To make a link out of an image just put:
<a href=“http://www.dragonhive.20fr.com”><img src=”dragon.gif”></a>
In the above case by clicking on the image “dragon.gif”
which is stored in the local directory, the page “http://www.dragonhive.20fr.com”
will open.
To create an email link:
<a href=mailto:oliverfielding@hotmail.com>Email me</a>
The above
opens the user’s email program and the “email to” box will be filled in,
when you click on the words “Email me”.
And finally lines:
An easy bit just to finish off with. You can create a horizontal line across your web page by using the tag <hr>. Or you can control your line with the code.